

The single best rule for beef: match the cut to the cooking method, then let a thermometer tell you when it’s done. Tender cuts like ribeye or filet want fast, high heat. Tough cuts like chuck or brisket want low, slow, and moist. Buy for the recipe, check marbling and thickness at the store, and pull the meat a few degrees early to account for carryover cooking.
TL;DR:
- Buying beef with higher marbling, especially USDA Prime, provides more flavor and makes cooking easier for most cuts.
- Tender cuts like ribeye and filet thrive with high-heat, quick cooking methods, while tougher cuts like brisket require slow, moist heat to break down connective tissue.
- Using a sharp knife and an instant-read thermometer ensures accurate doneness, with specific target temperatures for rare, medium-rare, and medium steaks.
- Thickness significantly impacts cooking time, so adjust heat and timing based on the meat’s size rather than weight alone.
- Proper resting, trimming, and slicing against the grain improve tenderness and juiciness, especially for larger roasts and tougher cuts.
Table of Contents
- Buying Beef: Primal Cuts, Marbling, and Grades That Actually Matter
- Which Cooking Method Fits Which Cut of Beef?
- How Do You Trim and Slice Beef the Right Way?
- What Internal Temperature Should Beef Be Cooked To?
- How Long Can You Store Raw and Cooked Beef?
- Quick Cheatsheets for Grilling, Searing, Braising, and Ground Beef
- A Note on Tools and Technique
- Recommended Tools for Better Beef Results
- Sources
- FAQ
Buying Beef: Primal Cuts, Marbling, and Grades That Actually Matter
Every cut of beef traces back to one of eight primal sections: chuck, rib, short loin, sirloin, round, flank, short plate, and brisket. The muscles that do the least work, mainly the rib and short loin, stay tender and cook fast over dry heat. The muscles that carry weight and work hard, like chuck and brisket, are packed with connective tissue and need time and moisture to break down.
Marbling, the white flecks of fat running through the muscle, is what separates a USDA Prime steak from a Choice or Select one. More marbling means more flavor and a more forgiving cook, since that fat bastes the meat from the inside as it heats. Prime is worth the splurge for a special-occasion ribeye. Choice is the sweet spot for most weeknight cooking, and Select works fine for cuts you’re braising or marinating anyway, where tenderness comes from the technique, not the marbling.
A few shopping habits save you money and disappointment:
- Buy for the recipe, not the impulse. Stocking up on strip steaks you’ll rarely grill just ties up freezer space.
- Check thickness, not just weight. A 1.5 inch steak cooks and rests differently than a 0.75 inch one.
- Ask the butcher to trim, portion, or tie a roast. It’s a free service most counters offer and it saves you a step at home.
- For whole-animal buying or bulk cuts, a primal-cut breakdown guide helps you understand what you’re actually getting.
Which Cooking Method Fits Which Cut of Beef?
Dry heat cooks fast and hot with no added liquid, think grilling, pan-searing, or broiling. Moist heat surrounds the meat in liquid at a gentler temperature, like braising or stewing. Combination cooking sears first for flavor, then finishes low and slow, which is exactly how a good pot roast or braised short rib gets made.
The primal cut you’re working with tells you almost everything about which lane it belongs in. Tender cuts from the rib and short loin, ribeye, strip, filet, T-bone, do best dry and fast. Tougher cuts loaded with connective tissue need the opposite treatment.
Here’s the quick map:
- Ribeye, strip steak, filet, T-bone: grill or pan-sear, high heat, short time.
- Chuck roast, brisket, short ribs: braise or slow-smoke, low heat, hours not minutes.
- Flank and skirt steak: quick high heat after a marinade, sliced thin against the grain afterward.
- Sirloin and round: moderately tender, good for grilling or roasting but easy to overcook past medium.
Thickness changes your timing more than most people expect. A thin skirt steak can go from perfect to overdone in under a minute on a hot grill, while a thick chuck roast might sit in the smoker for six hours and still need more time. Matching the cut to the method is the difference between a fork-tender braise and a chewy disappointment.
How Do You Trim and Slice Beef the Right Way?
Good beef starts with a good knife. A sharp chef’s knife makes clean cuts through fat and muscle without tearing the meat, while a dedicated carving knife gives you the long, even slices a roast or brisket deserves. Dull blades are actually more dangerous than sharp ones, since they slip and require more force to push through.
Fat matters more than people think. Leave the fat cap on a brisket or pork shoulder style cook, since it renders slowly and keeps the meat moist. Trim heavy exterior fat off steaks going on a hot grill, though, since it can flare up and burn before the meat even cooks through.
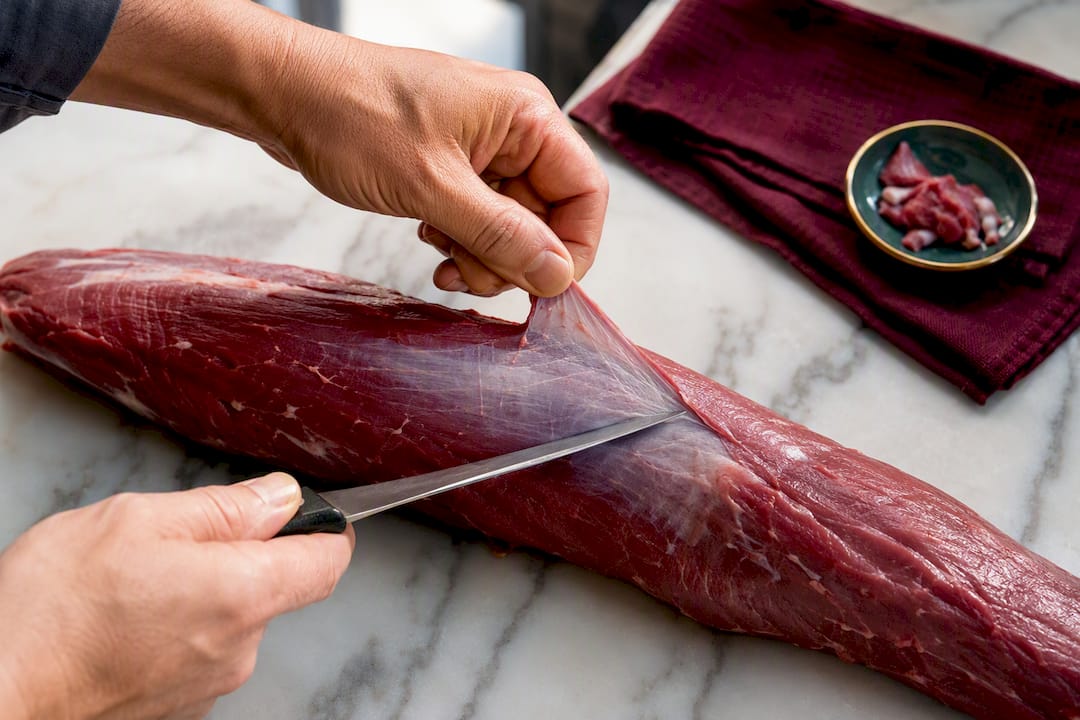
Silver skin, that shiny, tough membrane on cuts like tenderloin or flank, won’t render out no matter how long you cook it. Slide a paring or boning knife between the membrane and the meat at a slight upward angle, and pull the membrane taut with your other hand as you go. It comes off clean with almost no meat wasted once you get the angle right.
Finding the grain just means looking at the direction the muscle fibers run. Slice against it, perpendicular to those fibers, and cuts like flank, skirt, and brisket go from chewy to tender in an instant. Aim for slices about a quarter inch to a third of an inch thick for most steaks.
Pro Tip: Tilt your knife at a slight angle while slicing flank or brisket, not straight down. It shortens the muscle fibers even more and makes each bite noticeably more tender.
For more on breaking down cuts at home, this meat butchering guide for home cooks covers trimming techniques step by step.
What Internal Temperature Should Beef Be Cooked To?
Color and touch are guesses. A thermometer is the truth. Insert an instant-read thermometer into the thickest part of the cut, avoiding bone and pockets of fat, both of which read hotter or cooler than the actual meat and throw off your number.
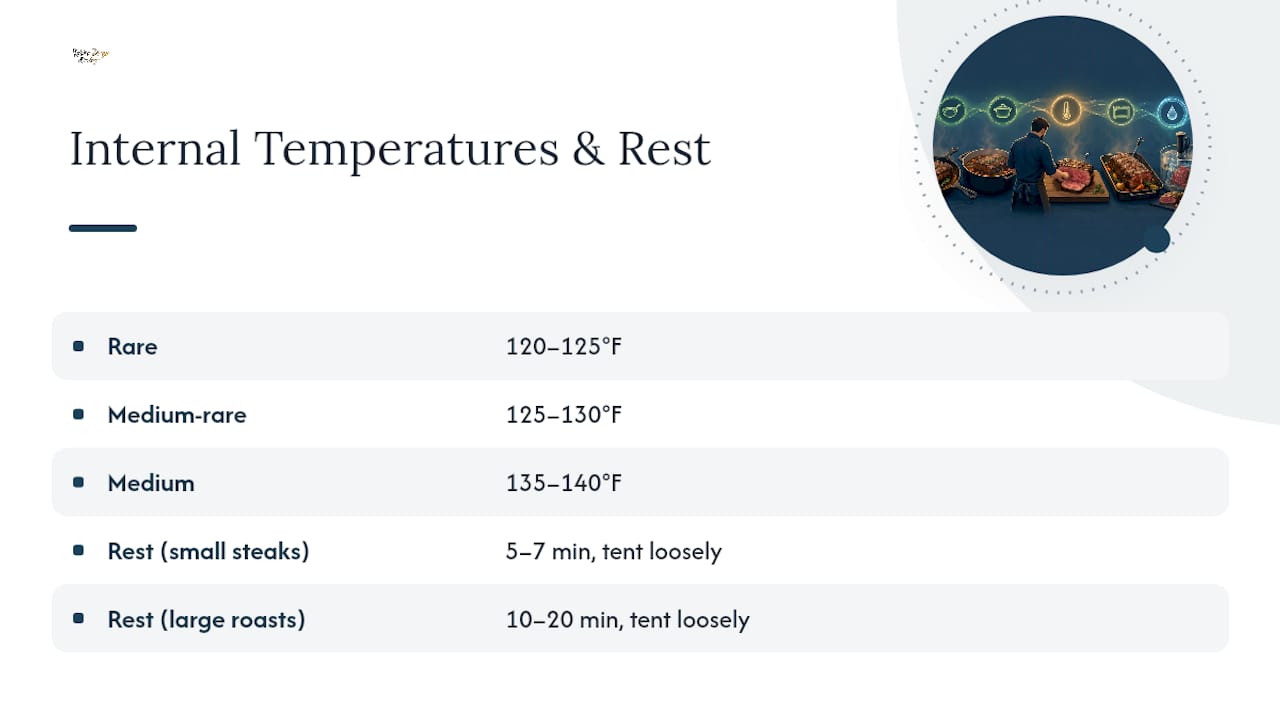
Target temperatures for steaks: rare sits around 120 to 125°F, medium-rare around 125 to 130°F, and medium around 135 to 140°F. Ground beef needs to reach a higher safe temperature, since grinding exposes more surface area to bacteria that whole muscle cuts don’t face in the same way.
Pull the meat off the heat before it hits your target number. Carryover cooking typically adds a few more degrees as residual heat keeps working its way through the meat after it leaves the pan or grill. A steak pulled at 125°F often lands right at 130°F by the time you cut into it.
Resting matters just as much as the number on the thermometer. Small steaks need about 5 to 7 minutes of rest, tented loosely, while larger roasts benefit from 10 to 20 minutes depending on their size. Skip the rest and all those juices end up on your cutting board instead of in the meat.
How Long Can You Store Raw and Cooked Beef?
Raw beef holds safely in the refrigerator for a few days, while cooked leftovers should be eaten within about the same window. Freezing extends things considerably, especially if you wrap tightly or vacuum seal to fight off freezer burn.
Thawing correctly matters as much as storing correctly. Never thaw beef on the counter, since the outer layer can sit in the bacterial danger zone long before the center even softens.
- Refrigerator thawing is the safest and most reliable method, just plan a day ahead for larger cuts.
- Cold water thawing works when you’re in a hurry, changing the water every 30 minutes to keep it cold.
- Microwave thawing is fine for last-minute needs, but cook the meat immediately afterward.
Keep raw beef and its juices away from anything you won’t cook, and sanitize cutting boards and counters right after prep. Ground beef in particular should always hit its full safe internal temperature, since it mixes meat from multiple parts of the animal and carries more risk if undercooked.
Quick Cheatsheets for Grilling, Searing, Braising, and Ground Beef
- Grilling: preheat fully, pat steaks dry before seasoning, sear hot and direct for a crust, then move thicker cuts to indirect heat to finish without burning the outside.
- Skillet-to-oven: sear hard in a hot pan for color, transfer to a preheated oven around 400°F to finish, pull a few degrees early, then rest before slicing.
- Braising and smoking: sear the meat first to build flavor, then cook low between 225 and 300°F for hours, checking tenderness with a probe rather than a clock.
- Ground beef: break it up for even browning, drain excess fat if the recipe calls for it, and cook through to a safe internal temperature every time.
A braised chuck roast turns into a great beef vegetable barley soup once it’s fall-apart tender, and smoked short ribs pair beautifully with something like duchess potatoes and garlic butter sauce if you want to turn a weekend cook into an event.
A Note on Tools and Technique
Recommend investing in two things: a genuinely sharp knife and a reliable instant-read thermometer. Neither is expensive, and both do more for your results than any recipe trick. Once you internalize the cut to method rule, grocery shopping gets simpler, waste drops, and every piece of beef in the cart already has a plan.
— Alan
Recommended Tools for Better Beef Results
Good technique only gets you so far without the right tools backing it up, and that’s exactly where Wine Drop Cookery earns its keep: a knife that holds an edge and a thermometer you trust turn every cut in this guide into a reliable cook, not a gamble. A Damascus steel chef knife handles everything from trimming silver skin to slicing brisket against the grain, and it holds its edge far longer than the average kitchen drawer knife.

If you grill often, a grilling essentials combo kit rounds out your setup with the utensils you actually reach for, tongs, a sturdy spatula, and turners built to handle direct heat without warping. For readers who want recipe inspiration to go with their new gear, Yumzi curates weekly meal plans that make it easy to put a fresh cut of beef to good use the same day you buy it. Browse the full kitchen essentials collection and pick out the pieces that match how you actually cook.
Sources
- Beef Cookery Publication - North Dakota Beef (NDBeef)
- Understanding Beef Cuts: A Beginner’s Guide - ISBE
- How to Cook Beef: Best Cooking Method for Every Cut - Clover Meadows Beef
- Keeping meat moist: cuts, marinades and cooking methods - ChefWorks
FAQ
What Is the Best Temperature for Medium-Rare Beef?
Medium-rare beef is generally pulled between 125 and 130°F, with carryover cooking adding a few more degrees during the rest.
What Is the Safe Internal Temperature for Ground Beef?
Ground beef needs a higher safe internal temperature than whole-muscle steaks because grinding exposes more surface area, so always cook it through completely and check with an instant-read thermometer.
How Do You Slice Flank Steak Correctly?
Find the direction the muscle fibers run, then slice against that grain in thin pieces, roughly a quarter inch thick, to shorten the fibers and make each bite noticeably more tender.
How Long Should a Beef Roast Rest Before Slicing?
Larger roasts benefit from resting 10 to 20 minutes depending on size, while small steaks only need about 5 to 7 minutes tented loosely with foil.
Which Cuts of Beef Are Best for Grilling?
Ribeye, strip steak, filet, and T-bone come from the tender rib and short loin sections, which makes them the best choices for fast, high-heat grilling.
0 comments